Processing checks in Diamond is a relatively easy process to perform. Checks are set up by adding a "Job" and corresponding options. Jobs can include:
Any combination of check types / company / state / line of business (e.g., Return Premium, Claims, Suspense Account checks for all states / lines of business for a company)
A single check type / company / state / line of business (e.g., Return Premium for the state of Ohio, Personal Auto).
Once the job has been set up with corresponding options (Generate, Add, Edit, Renumber, Print or Export and Post), users can:
Run each option process "manually" by clicking the Next button on the Check Processing Wizard screen. Only those screens relating to the options chosen in the Job Setup screen are displayed.
Run the process automatically by clicking the Process Defaults button. When processing the defaults, all applicable information must be selected on the Job Setup screen.
Note: Once a check type / company / state / line of business combination is selected for a job, it cannot be added to any other job unless it is deleted from an existing job.
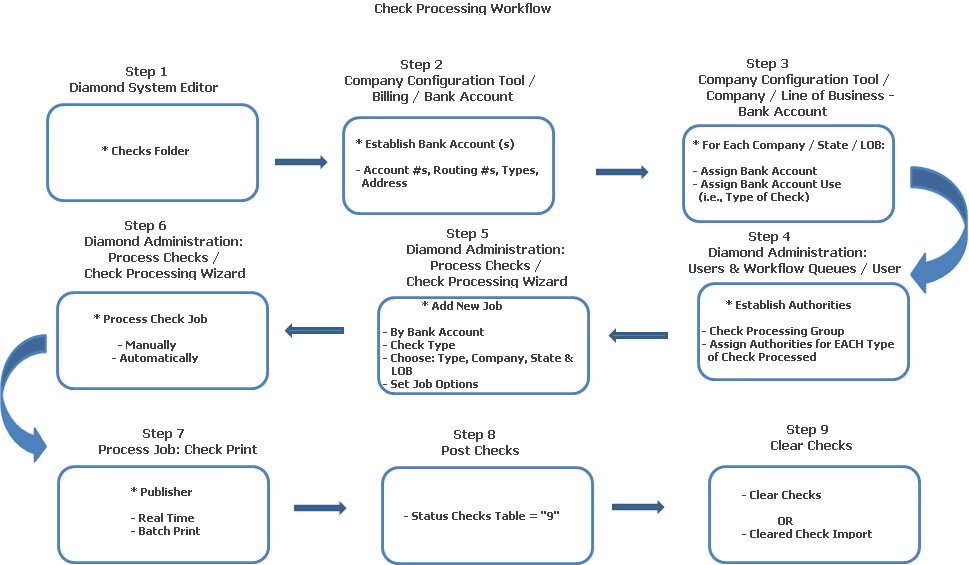
The diagram below shows how checks are processed in Diamond.
Prior to using Check Processing, review the system settings in the Checks folder listed in the table below. Set these according to your company's requirements.
Field |
Value / Function |
Options |
Default |
Allow Renumber After Export |
This determines if checks can be renumbered after they have been exported for printing. |
False
= Disable. The system does not allow a user to renumber any of
the check types after they have been exported for printing. |
False = Disable.
|
Allow Printed Exported Imported Check Deletion |
Determines if any printed, exported or imported Return Premium, Claims, Commission and Suspense Account check can be deleted in Check Processing. |
False
= Any printed, exported or imported Return Premium, Claims, Commission
and Suspense Account check cannot be deleted in Check Processing. |
False = Disable. |
Custom Cleared Check Import |
This determines if implementations can create their own custom cleared check import to clear checks or use the Base System Cleared Check function. |
False
= Disable. When the Cleared Check Import is used, the import will
use the Base code that processes the XML file. |
False = Disable. |
Export Positive Pay File After Post |
Determines when a Positive Pay file is created: At the time the checks are posted or when they are exported. |
False = Disable; creation of the Positive pay file occurs at the time the checks are exported. True = Enable; creation of the Positive Pay file occurs at the time the checks are posted. |
False = Disable. |
Positive Pay Directory |
Used for the Positive Pay Export functionality. This is the destination folder where all positive pay files are placed. All positive pay export and positive pay exception files are generated and placed in this folder. |
Implementation Specific. |
Blank |
Send Automatic Refunds To Premium Finance Company |
This is used to determine whether or not automatic return premium checks are sent to the premium finance company listed on the policy. |
False
= Disable. Do not send automatic return premium checks to the
premium finance company listed on the policy. |
False = Disable. Do not send automatic return premium checks to the premium finance company listed on the policy. |
Use Agency Group Address For Commissions |
For agencies that are set up under an agency group, any commission checks can now be mailed to the agency group address. Determines if the commission checks are sent to the agency's group address or the agency itself. |
False
= Disable; checks will be sent to the agency's address not an
agency group address. |
False = Disable.
|
Use And Instead Of And / Or |
Determines the wording between two (2) Pay To's on a Return Premium Check. |
False
= When this is set to "0," and a user processes a Submit
Refund to Check Processing transaction to submit a check having
two (2) policyholder names, the Pay To for the check will have
"and / or" between the names. |
False = Use "and / or." |
Validate Check Number on Manual Refunds |
This is used to determine if the check number entered on a manual billing adjustment refund will be validated to make sure that it has not already been used. If the check number has previously been used, then an error will be returned and the refund will not be allowed to go through. |
Implementation Specific. False = Disable. |
False = Disable. |
Void Check Export Directory |
Name of the path that holds file for checks that are voided for the GL Interface. |
Implementation Specific; user defined. |
C:\DiamondPaths\Checks |
Write Company Export XML File |
Determines if your company is using the Base System Check Export or your implementation's Check Export. |
False
= Use Base System Check Export. |
False = Use Base System Check Export. |
Next, establish the bank account (s) your company will use in Company Configuration Tool / Billing Bank Account. Entries here include:
Account Number: Corresponding account number.
Bank Account Type: Select either "Checking" or "Savings;" defaults blank.
Starting Check Number: If bank account type is "Checking," enter the starting check number.
Bank Name: Name of banking institution.
Routing Number: Corresponding routing number; nine (9) characters.
Address: Select Address to return the Edit Address screen. Make the necessary entries for the bank's address and choose OK.
Account Status: For a new bank account, defaults "Open;" do not change.
Positive Pay Export: If you will be exporting your checks to a bank for reconciliation, click in this field to place a check mark.
The bank account (s) must then be assigned to each state / line of business combination for your company. This is done in the Company Configuration Tool / Company / Line of Business (tab) / Bank Account (tab).
In the upper portion of the screen, highlight the line of business the checks are being processed for.
Highlight the bank account in the Accounts Assigned section to the left.
Choose Add.
When the Add Bank Account Use screen is presented, select the check type (use) from the combo box.
Click Save. The use is displayed in the list view.
Note: You can assign more than one (1) check type for an account.
Here you set up authorities for users to process, clear / unclear each type of check in addition to add, edit and delete Check Jobs. Authorities listed in the table below are in the Check Processing group.
Workflow Authority |
Location in Diamond |
Impact on User |
Add / Delete / Edit Jobs |
Diamond: Diamond Agent Caution Sign / Administration / Check Processing Wizard |
Users given the authority to Add, Edit and Delete Jobs may perform these functions to access the Job Setup screen. |
Agency Commission Check Process |
Diamond: Diamond Agent Caution Sign / Administration / Check Processing Wizard / Run Agency Commission Checks |
User can process agency commission checks. |
Claim Check Process |
Diamond: Diamond Agent Caution Sign / Administration / Check Processing Wizard / Run Claim Checks |
Allows user to process claim checks. |
Clear / Unclear Agency Commission Checks |
Diamond: Diamond Agent Caution Sign / Administration / Process Checks / Clear Checks |
Allows user to reconcile / un-reconcile agency commission checks. |
Clear / Unclear Claim Checks |
Diamond: Diamond Agent Caution Sign / Administration / Process Checks / Clear Checks |
Grants authority to reconcile / un-reconcile claim checks. |
Clear / Unclear Return Premium Checks |
Diamond: Diamond Agent Caution Sign / Administration / Process Checks / Clear Checks |
Grants authority to reconcile / un-reconcile return premium checks. |
Clear / Unclear Suspense Account Checks |
Diamond: Diamond Agent Caution Sign / Administration / Process Checks / Clear Checks |
Grants authority to reconcile / un-reconcile suspense account checks. |
Edit Checks |
Diamond: Diamond Agent Caution Sign / Administration / Check Processing Wizard |
This authority allows a user to edit the mail-to and payee of a check. If the user does not have this authority, they are only able to view the check and cannot change anything on the check. In the New Job Setup, there is a check box to edit checks. If this box is checked and the user does not have the authority, they are not allowed to edit the check. |
Edit Municipal Activity Statement |
Diamond: Diamond Agent Caution Sign / Administration / Process Checks / Municipal Check Setup / Highlight Tax Code (Municipality) / Edit Statement Button |
Allows a user to adjust the amounts of the municipal check activity statements. |
Generate Automatic Refund Checks |
Diamond: Diamond Agent Caution Sign / Administration / Check Processing Wizard |
Grants authority allowing the user to generate automatic refund checks. |
Generate Commission Checks |
Diamond: Diamond Agent Caution Sign / Administration / Check Processing Wizard |
Allows user to generate commission checks. |
Generate Municipal Checks |
Diamond: Diamond Agent Caution Sign / Administration / Check Processing Wizard |
Gives users authority to generate municipal checks. |
Municipal Check Process |
Diamond: Diamond Agent Caution Sign / Administration / Check Processing Wizard |
Users can create municipal check process jobs. |
Process Checks |
Diamond: Diamond Agent Caution Sign / Administration / Check Processing Wizard |
Authority allows user to access the Check Processing. |
Return Premium Check Process |
Diamond: Diamond Agent Caution Sign / Administration / Check Processing Wizard |
Users can create return premium check process jobs. |
Suspense Account Check Process |
Diamond: Diamond Agent Caution Sign / Administration / Check Processing Wizard |
Gives a user authority to create suspense account check jobs. |
Void Checks |
Diamond: Diamond Agent Caution Sign / Administration / Process Checks / Void Checks |
Grants authority to allow the user to void checks; includes regular checks, canceled checks and checks that have had a stop payment placed on them. This is for all checks: Agency Commission, Return Premium, Suspense Account and Municipal. (Note: Claim checks are voided in the Claims System. There is a different authority for voiding these.) |
Setting up (or adding) a job is done in Diamond Administration: Process Checks / Check Processing Wizard.
Bank Account: Select the bank account you are using for the job from the combo box. If you wish to see more information about the account you selected, click the Detail button to return the Bank Account Detail screen.
Click Add to return the Add New Job screen.
Job Name: Enter the name of the job checks are being processed for on the Add New Job screen.
Check Types (Claims, Claim Drafts, Agency Commission, Return Premium, Suspense Account and Municipal): For each type of check you want to include in the job, click in the field to place a check mark. As you make your selections, each company / state / line of business / check type is displayed in the list view.
Next, set up the options for running the job:
Generate Checks (Return Premium and Agency Commission Checks Only): Select to create the checks to be included in the job. These are checks that have been added to the system since the last check processing run.
Add Checks: This selection adds all types of checks to the queue.
Edit Checks (Return Premium Checks Only): This selection is used for editing Return Checks only; all others, the field is protected and cannot be selected. When Return Premium checks are chosen, the field automatically defaults with a check mark.
Set Accounting Date (Agency Commission Checks Only): This selection is used for setting the accounting date for Agency Commission Checks only; all others, the field is protected and cannot be selected.
Can Renumber Checks / Starting Check Number: Select the "Can Renumber Checks" field to place a check mark in the box if your company is numbering their own checks. Enter a corresponding check number.
Manually Renumber Checks: If you are running the job automatically by using the Process Defaults button, click to place a check mark in this field. The system stops at the Renumber Check screen and allows the user to either confirm or override the number. Once the user confirms or changes the information, the Check Wizard automatically finishes the remaining defaults.
Print Checks: Select if you are printing your checks at your company using the Print Manager.
Export Checks: Select this to send your checks to a 3rd party vendor for processing. You may enter the Export File Path or click the ellipse button opposite the field to browse for the file path name. Next, enter the name of the Export File. Place a check mark in the Generate Export XML field to generate the XML file for export prior to posting them.
Import Checks: You can specify if you want to include the import of checks during the job as well. You may enter the Import File Path or click the ellipse button opposite the field to browse for the file path name. Next, enter the name of the Import File. When the import runs, it transfers a batch of checks with their corresponding check numbers into the file for posting. If "Post Checks" has been set as an option, the imported checks are then automatically included as part of the "Post" process.
Post Checks: This is the final step in processing any job only AFTER the checks have been exported. Checks cannot be posted if they have not been exported. Click the field to place a check mark in it.
Click Save to return the Check Processing Wizard screen. This places the "Job" in the Jobs list view and all of the check types / company / state / lines of business in the job items list view at the bottom of the screen.
After your job has been set up, you may now process the job. There are two (2) ways you can do this:
Manually
Automatic
To start processing a job manually:
Click the Next button at the bottom of the screen to begin. This displays the Select Checks screen and begins to process your check selection. (Note: Anytime the Back button is chosen, this takes the user to the first step within a given check type.)
A Tree View is displayed to the left of the screen. The Tree View displays all options you selected for processing the job during its initial set up. As each process runs, the Tree View displays the option (step) you are running when clicking the Next button.
You will be asked to confirm some of the validations when running your job manually.
After Post, click Next one more time to finish your job.
A Summary screen is presented with all of the job's activity listed.
To start processing a job automatically:
Click the Next button at the bottom of the screen to begin. This displays the Select Checks screen and begins to process your check selection.
Select Process Defaults. This runs your job from start to finish with no user intervention. A Summary screen is presented with all of the job's activity listed when finished.
• To process a single check, place a check mark next to only that check in the list of available checks.
• Advance through the check job as normal.
There is done two (2) ways:
Export
If you have chosen Print, checks will be sent to the Print Manager and printed at your company. Once printed, their status in the Checks table is "5."
If you have chosen Export Checks, named a file path and file name, the checks will be exported to a file. Once exported, their status in the Checks table is "7."
This is the last phase of your check job. "Posting" the checks updates them. Once checks are posted, they are removed from the Check Processing Wizard screen. Their status in the Checks table is "8."
The Clear Checks process is used to reconcile all four (4) check types: Return Premium, Agency Commission, Claim Checks and Suspense Account Checks. If you have accidentally cleared a check, you can use the Unclear option to change it back to a "Cleared" status.
Fields on the top of the screen are:
Account Number: Select from the combo box the bank account number for the checks you will be clearing.
Bank Name / City / State / Routing Number: After selecting the account number, these fields default the corresponding information.
Cleared Display (All, Cleared, Uncleared): Select to determine the type of checks you want displayed by clicking in the field.
Filter By: Select how you want the checks to be cleared by from the combo box. Base System values are: Amount, Check Added, Check Number, Date Cleared and Printed Date.
From / To: Enter the dates after choosing how they will be filtered.
Filter Button: Select after you have made your "Filter" entries and selection.
Date Cleared: This is the actual date the checks cleared the bank. It defaults with the current system date but may be changed to show the actual date the checks cleared; entry format MM/DD/YYYY.
Number of Checks: Displays the number of checks returned matching the filter criteria; protected field.
To clear the checks selected, click Clear Checks. The checks are removed from the list view. Checks are flagged as "12" (Reconciled) in the Checks table.
If your company has a bank reconciling your checks, you can use the Cleared Check Import function to import the checks into Diamond.
To import checks, select Cleared Checks Import from the Check Process Tree View in Diamond Administration.
When the Cleared Check Import screen displays:
Enter the name of the import path or click the ellipse button to the right to browse for the path.
Click Import.
The system imports the checks found in the file.
When finished, Diamond displays a summary screen, showing the number of checks imported from each bank account and the total amount for each account.
Click OK to exit the import.
Agency commission checks are processed in Diamond two (2) ways:
Agency Commission Checks: Special Notes
Special Notes:
There are no special rules to consider when processing claim checks. End-of-Day or End-of-Month does not have to be run prior to processing the checks. Once a claim transaction has been entered and issued against a claim feature / coverage, a claim check can be generated.
Refund (Credit) Exists: When a credit balance exists, such as an over payment, on a client's policy, a return premium check can be generated. This happens when there are no future installments and the billing method is "Direct Bill."
• Exporting Checks: If your company is exporting checks to a 3rd party vendor, checks must be exported prior to being "Posted" (updated).