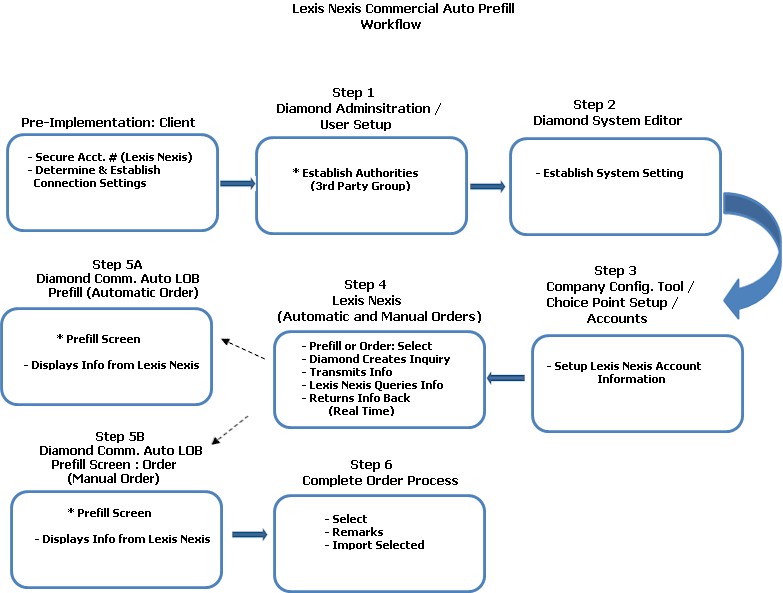
This is an interactive interface that connects to Lexis Nexis ® for ordering the Commercial Auto Data Prefill product with the VIN Service. Carriers having fleets of commercial autos will find this interface especially useful as it reduces the amount of time it takes to enter vehicle information while reducing the chance of data entry error.
There are two (2) methods for ordering Commercial Auto Data Prefill:
Automatic: This only occurs on quotes / "Pending" new business policies, and happens when a user first accesses the Prefill screen.
Manual: This button is only available for quotes / "Pending" new business, "Pending" Renewal Underwriting and quotes / "Pending" Renewal transactions. This will allow ordering Commercial Auto Data Prefill even if a prior order has already occurred.
Prior to use, it is the client's responsibility to contact Lexis Nexis and arrange the following:
Secure an account number and contract for Commercial Auto Data Prefill
Determine and establish the connection settings
Each user using the Commercial Auto Prefill interface must have the following authorities in the 3rd Party group:
Workflow Authority |
Impact on User |
Allow Automatic Order |
Will allow the automatic ordering of Lexis Nexis reports such as MVR when it’s part of the normal policy navigation or renewal workflow. |
Can Manual Order Commercial Prefill |
Determines if a user can manually order Commercial Data Prefill. |
Set the system setting listed in the table below to suit your needs.
Field |
Value / Function |
Options |
Commercial Auto Prefill Require Remarks |
Used to determine if remarks are required for all un-imported vehicles from the Commercial Auto Data Prefill screen. |
False = Remarks
are not required for all un-imported vehicles. |
If your company already has an account number with Lexis Nexis for other products, and the "Product Type" is set to "All," the Commercial Auto Data Prefill will use that account to establish a connection.
If your company does not already have an existing account, you will need to set up the Lexis Nexis account information.
Environment: Required. You can set up the same account for any of the following environments: Production, Test and Support. It is recommended you set up at least a Test and Production environment.
Company: Select your company name for the account number.
Agency: Protected; indicates all agencies are using the company account number.
Transmission Type: Select “Interactive.”
Product Type: Select "Auto Data Prefill Commercial."
State: Leave blank to include “All” states for your company. (Note: If you are choosing a state, then the corresponding line of business is required as well.)
Line of Business: Leave blank to include “All” LOBs for a company.
Allow Agency Users to Order Using This Company Account: Leave the check mark in this field.
Underwriter Suffix: Leave blank.
Agency Suffix: Leave blank.
Account Number: Enter the account number (typically six digits) assigned by Lexis Nexis.
Node: Enter the node assigned by Lexis Nexis.
Once a user selects Prefill (automatic orders) or Order (manual orders), Diamond creates and stores in its entirety a Lexis Nexis E.D.I.T.S. inquiry message and transmits it to Lexis Nexis. Lexis Nexis then queries its data and returns an E.D.I.T.S. results message back to Diamond in "real time."
Diamond stores the result message, parses out / stores the vehicle data and displays the discovered vehicles in a Grid on the Prefill screen. Fields shown include:
Num: System assigned number generated for each discovered vehicle returned from Lexis Nexis.
Received Date: This is the received date of the order the :discovered" vehicle was returned and added as a "Prefill" vehicle.
Status:
Reported: The vehicle was returned from Lexis Nexis but not imported as a new vehicle on the policy.
Imported: Successfully imported as a new vehicle on the policy. Note: A vehicle is only allowed to be imported one (1) time as a policy vehicle.
Year: Vehicle year returned
Make: Vehicle make returned.
Model: Vehicle model returned.
VIN: VIN Number returned.
Remarks: User comments can be added on "discovered" vehicles. This provides an audit trail as to the reason why vehicles are not imported as policy vehicles. Note: Remarks are optional or can be a required entry based on the system setting, "Commercial Auto Prefill Require Remarks" in the Choice Point folder.
Note: If Prefill data has already been ordered once, automatic ordering will not occur again when the user navigates to the Prefill screen
On the Prefill screen, "manually" ordering vehicle data occurs when the user clicks the Order button. This function allows:
Ordering of Commercial Order Data Prefill even if a prior order (existing Prefill data) has already occurred.
Ordering of Commercial Order Data Prefill when there is no existing Prefill data from a prior order.
If there is existing Prefill data at the time of the "manual" order, the system compares the VIN, Year, Make and Model of each newly returned discovered vehicle with all existing Prefill vehicles.
When an exact match is found on VIN, Year, Make and Model, Diamond will not add the discovered vehicle returned as a new "Reported" vehicle.
If an exact match is not found on VIN, Year, Make and Model, Diamond adds the discovered vehicle or vehicles returned as a new "Reported" Prefill Vehicle.
If no existing Prefill data exists from a prior order, Diamond processes the manual order just like an automatic order. It parses out all discovered vehicles, saves them and displays them on the Grid View with a status of "Reported."
In both cases (Existing and Non-Existing Prefill Data), the "newly added" vehicle numbers are incremented by one (1) based on the highest vehicle number already added.
Complete the import by doing the following:
Use the Select control in the upper left of the Grid View to place a check mark opposite all vehicles whose status equals "Reported." (Note: Only those vehicles whose status is "Reported" can be selected for import.) If selected a second time, this will remove the check mark in the control and deselect all Prefill vehicles having a status of "Reported."
Remarks: Required; for those vehicles not being imported. Enter a brief comment as to the reason for not being imported (e.g., "Incorrectly reported," or "Vehicle no longer owned by insured," etc.).
Once you have reviewed and selected the vehicles to import, click the Import Selected button.
When the import completes, the Status field on each vehicle selected for import is changed from "Reported" to "Imported." A validation showing the number of vehicles is also shown.
Click OK.