Error Log: Users must have the "Error Log" authority in the Diamond Administration group.
Scheduler Setup: Users must have the "Scheduler Setup" in the Diamond Administration group.
If you do not want to use an FTP site for exporting your Error Log, you can skip this step; however, if you wish to use an FTP site and wish to receive email confirmation letting you know the export has occurred, this step allows you to define those values and is required.
Number of Threads: This is the number of threads that run the batch posting in a multi-processor environment on the business server; default value is "5." This is implementation specific.
Establish the email notification settings, so that when the Error Log is exported, an email is sent. These settings are all specific to your implementation.
Email CC: Names of the users a carbon copy Email will be sent to for the Error Log Export job.
Email From: Name of the user initiating the Email for the Error Log Export.
Email To: Names of the users an Email will be sent to for the Error Log Export.
Mail Server Connection Timeout: Determines the number of seconds before the mail server's connection times out.
Mail Server Name: Name of the Mail Server.
Mail Server Password: Mail Server's User Password.
Mail Server User Name: Mail Server's User Name.
Proxy Domain: User's domain for connection to the proxy server.
Proxy Enabled: Determines if a proxy server is being used to forward calls through. Values are "0" (Disable) and "1" (Enable). Set this value to "1."
Proxy Name: Determines the proxy server's name / IP address.
Proxy Password: User's password for connection to the proxy server.
Proxy User Name: User's user name for connection to the proxy server.
Send Notification: Determines if Email Notifications will be sent when using the Error Log Export function. Values are "0" (Disable) and "1" (Enable). Set this value to "1."
Next, set up the values for your FTP site. These settings are all specific to your implementation.
Domain: Determines the user's domain for connecting to the target FTP server.
Password: This is the user's password for connecting to the target FTP server.
Proxy Domain: User's domain for connection to the proxy server.
Proxy Enabled: This is used to determine if a proxy server is being used to forward calls through. The default value is "0" (Disable). Set this to "1" (Enable).
Proxy Name: Determines the proxy server's name / IP address.
Proxy Password: User's password for connection to the proxy server.
Proxy User Name: User's name for connection to the proxy server.
Upload Files: This is used to determine if your implementation will upload the files from the Error log Export. Values are "0" (Disable) and "1" (Enable). Set this value to "1."
URL: Determines the URL to target FTP and sub folders.
User Name: User's name for connecting to the target FTP server.
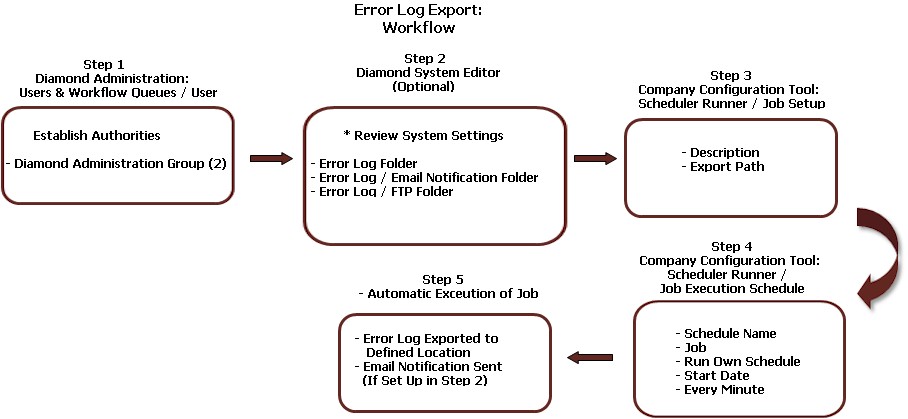
Access the Scheduler Runner / Job Setup function in the Company Configuration Tool. Here, you will identify the name of the job (e.g., Error Log Export):
Click Add Error Log Job
Description: Enter the name of the job.
Export Path: Enter the target root folder where the uploaded file will be exported to. If you are using the FTP site, this is the name of the URL identified in the Error Log / FTP Folder.
Click Save when finished.
Next, set up when you want the job to run in the Company Configuration Tool - Scheduler Runner / Job Execution Scheduler.
Click Add to return the New Job Schedule screen. Make the following entries / selections:
Schedule Name: Enter the name of the process you are scheduling (e.g., Error Log Export).
Job: Next, select the job you set up (in Job Setup) from the combo box.
Run Own Schedule: Place a check mark in this box to run by itself.
Run
Schedule: This is used to
define the time / day you want the job to start.
Run Time: This is the time
of day you want the process to start.
Start Date: This is the date
you want to start the process.
Every Minute: Select this field to place a check mark. Enter the number of minutes in the corresponding field. (Note: The minimum number of minutes entered can only be 5.) The Scheduler polls this field the length of time entered here and exports the Error Log to the designated location.
Click Save to save your entries and selections. This displays your schedule in the Job Execution List View.
When the Scheduler Runner polls the designated time, the Error Log that is held is then exported to the defined location automatically. If Email notification has been set up, it also sends an email indicating the export has taken place.