Note: You must have authority to edit the following on the Claim Tree View: Listed Property Address, Listed Vehicle Policy Information and Loss Location.
The Claim Tree View holds all claim information. From this screen, claim information can be added and edited, notes and files can be attached, forms can be added and claim transactions can be initiated. Formerly known as the Claim Detail screen, there are two (2) parts. The Claim Tree View is shown on the left side of the screen and detailed information is entered on the right.
The left side of the screen is the actual "Tree View" containing all claimants, features and transactions on the claim. The claim number is listed in blue at the top of the screen with all subsequent information below. Folders with a plus (+) sign contain additional data that may be accessed by clicking on the plus sign to reveal the related sub-folders. When sub-folders are accessed, use the scroll bar at the bottom of the screen to scroll right and view the entry in its entirety.
Claimant: List of claimants associated with the claim.
Feature: All exposures and coverages for the listed claimant.
Transaction: The transactions that have been done on the listed claim. Claim transactions having a status of "Pending Issuance" are highlighted in pink on the Tree View. Claim transactions having a status of "Pending Approval" are highlighted in yellow.
Properties / Vehicles: Lists the property (home) or the vehicle (auto) associated with the claim.
Witnesses: If any witnesses have been added, these are listed.
Attachments: Additional information in the form of attachments are listed.
When any one of the folders in the Tree View is selected (Claimant, Feature or Transactions), the corresponding screen is activated with a Toolbar and a Grid View on the right side which displays all individual items directly under that folder.
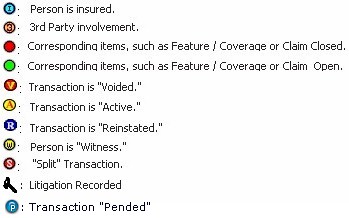
Listed below are icons, and what they represent, on the Claim Tree View.
Special Note: You may or may not see some of the icons on the Tree View. This is determined by the following system settings:
Claimant Folder: "Display Claimant Nature Code in Tree View." When this is set to "True," the code / abbreviation of the Nature of Involvement is displayed.
Claimant Folder: "Display Claimant Relationship Code in Tree View." When this is set to "True,"it shows the code / abbreviation of the Relationship to Policyholder (e.g., W = Other, X = Not Related).
Claimant Folder: "Display Driver Exclude Type Code in Tree View." When this is set to "True," the full driver excluded type or the code from the driver excluded type is displayed in the Claims Tree View.
Claims / Feature Folder: "Show Litigation Icon." When this is set to "True," the litigation icon (Gavel) shown at the Feature level when a feature / coverage is "In Suit."