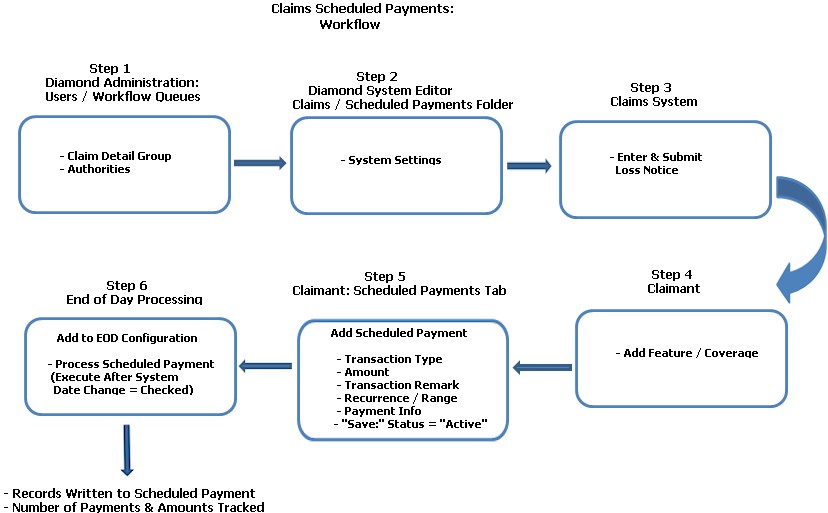
Scheduled Payments in the Claims System allows users to set up a Scheduled Payment Cycle for a fixed payment amount, such as a Wage Loss Payment.
Prior to implementing this function, users must have the authorities listed below in the Claim Detail group:
Add Scheduled Payment Cycle: Allows a user to add a Scheduled Payment Cycle.
Edit Scheduled Payment Cycle: Allows a user to edit a Scheduled Payment Cycle.
Delete Scheduled Payment Cycle: Allows a user to delete a Scheduled Payment Cycle.
View Scheduled Payment Cycle: Allows a user to view a Scheduled Payment Cycle.
Reinstate Scheduled Payment Cycle: Allows a user to reinstate a Scheduled Payment Cycle. (Re-activates a suspended Scheduled Pay Cycle.)
Release Scheduled Payment: Allows a user to release a Scheduled Payment. (Note: Otherwise known as issuing a “Pending” transaction.)
Suspend Scheduled Payment Cycle: Allows a user to suspend a Scheduled Payment Cycle. This will suspend a Scheduled Payment Cycle (stop it from generating payments at EOD). It will remain in this state until it is reinstated or the time period of the cycle expires.
Set the following options:
Create Transactions in Suspense: Values are “True” and “False.” “True” = The Scheduled Payments are added in suspense ("Pending”); requires the user to release it before it is issued. “False” = Scheduled Payments are added as issued; default value is “True.”
Enable Scheduled Payments: Values “True” and “False.” “True” = This makes the “Scheduled Pay” tab on the Claimant visible so a user with the proper authority can set up a payment cycle. “False” = The Schedule Pay tab is not shown. The default value is “True.”
Scheduled Payment Release Days: This specifies the number of days prior to issuance for the Scheduled Payment to be created in suspense. This is a numeric value. This is an implementation specific, user defined value. The default is “1.”
Send Tasks to Inside Adjuster: When Scheduled Payments are created, a task is generated and assigned to the user who created the cycle. Values are “True” and “False.” “True” = The task is assigned to the Inside Adjuster assigned to the feature / coverage of the Scheduled Pay Cycle. “False” = It will be sent to the user who created the Scheduled Payment Cycle instead; default value is “False.”
Enter the Date of Loss.
Enter / select all required information for submitting the Loss Notice.
Submit the Loss Notice.
Claimant: Enter Feature / Coverage
Exposure: Select the appropriate coverage exposure from the combo box.
Sub-Exposure: Select the claim sub-exposure related to the injury / accident covered by the policy from the combo box.
Coverage: Select the policy coverage from the combo box.
Sub-Coverage: Select the corresponding claim sub-coverage from the combo box, if applicable.
Save the information.
Note: Fields that are marked with a red asterisk are required fields.
Make the following entries and selections:
Transaction Type: Select based on the Feature / Coverage and Transaction categories. These are pre-filled based on the selections made when the Feature / Coverage was added.
Amount: This is the dollar amount that will be paid for each payment.
Transaction Remark: Free form field; enter a brief note about the payment.
Recurrence: Select the payment’s cycle. Choices include: Weekly, Bi- Weekly and Monthly.
Range: Depending on the payment cycle,default values are shown;change if necessary.
Payees / Mail To: Add the individual who will be receiving the payment as well as the individual / entity it will be mailed to.
Pay To the Order of: Add a different payee or build from the existing payee.
Once all information is selected / entered, click Save to retain. A record is added and displayed for review. Information includes:
Status: "Active"
Amount: The amount of the scheduled payment.
Recurrence (Cycle): Shows the payment cycle selected.
Coverage: Shows the Feature / Coverage against which the payment will be made.
Start / End Dates: The beginning and ending dates of the payment cycle.
Payments Made: "0" for a new payment. As payments are processed through the "Process Scheduled Claim Payments in End of Day Processing, this number is increased by one (1).
Total Paid: "$0.00 for a new payment. Again, as payments are processed through the "Process Scheduled Claim Payments in End of Day Processing, the Total Paid reflects a running amount of payments.
Payments that have not been suspended are picked up and applied in this function. These are written to the Scheduled Pay record for the Claimant. As each payment is processed, the number of payments and their corresponding amounts are tracked and increased. Payments that have been suspended will not be picked up until they are reinstated.
Because these Scheduled Payments are posted AFTER End of Day Processing finishes, a check mark should be placed in the Execute After System Date field. Payments are posted using the current system date (i.e., the next business day's date) as the Transaction Date.
If your implementation is processing Scheduled Payments in the Claims System, make sure this is added to your End of Day Configuration with a check mark defaulted in the Execute After System Date field.
Once a Scheduled Payment has been added, other options you have include:
Edit: This allows you to make changes to an existing Scheduled Payment, such as an Amount, Payee, Recurrence / Range, etc.
Delete: This allows users to remove a Scheduled Payment. This is only allowed if no payments have been made.
Suspend: This places a Scheduled Payment “On Hold.” Payments that are suspended stay in this state until they are reinstated or the time period of the cycle expires. Suspended payments are bypassed by the “Process Scheduled Claim Payments” function in End of Day.
Reinstate: Remove the Scheduled Payment from "hold." The payment will be picked up the next time it is scheduled by End of Day Processing.
Stop: Used to discontinue a Scheduled Payment Cycle. Once a “Stop” has been placed on a cycle, it cannot be reinstated.
Release: When the system setting, “Create Transactions in Suspense,” is set to “True,” the system creates a transaction “In Suspense.” A user with the authority, “Release Scheduled Payments,” can use the Release button on a transaction to release / issue the “Pending” transaction.