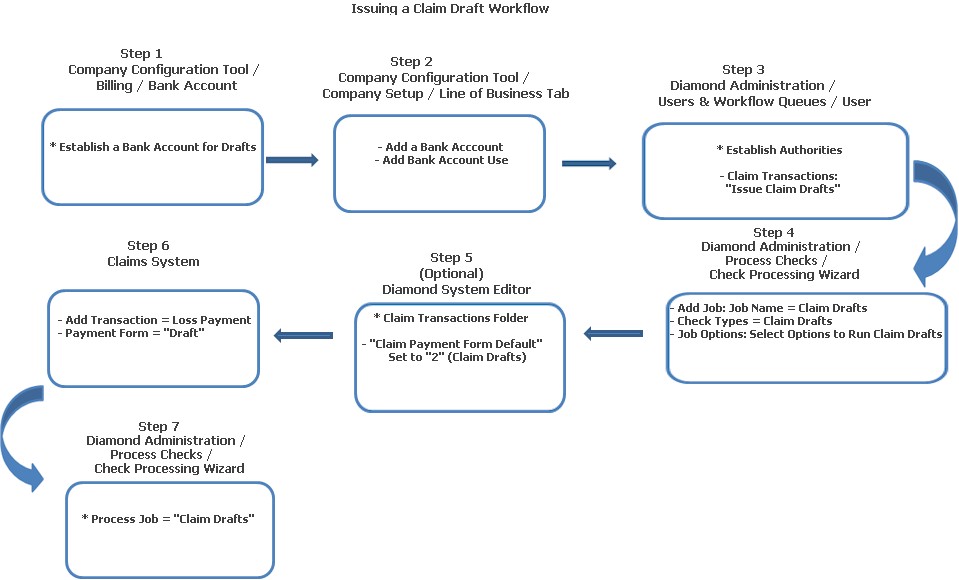
A "Draft" is defined as a type of payment that, when presented to the bank, will require authorization from the company for the payment to be processed. This functionality allows you to set up a specific account for Claim Drafts and Manual Claim Draft payments then issue Claim Transactions to these accounts. The drafts have different check types. When a claim payment is made, the user can select "Check" or "Draft" from the Payment Form combo box. The system then assigns the correct Check Types / Accounts. The drafts are processed through Check Processing similar to Claim Checks.
This Help File provides a workflow of the process as well as step by step instructions for issuing a claim draft.

Before you can issue claim drafts, you need to set up a bank account. This is done in Company Configuration Tool: Billing / Bank Account Setup. Once you have accessed Bank Account Setup:
Account Number: Enter the corresponding account number.
Bank Account Type: Select either "Checking" or "Savings;" defaults blank.
Starting Check Number: If bank account type is "Checking," enter the starting check number.
Bank Name: Name of banking institution.
Routing Number: Corresponding routing number; nine (9) characters.
Address: Select Address to return the Edit Address screen. Make the necessary entries for the bank's address and choose OK.
Account Status: For a new bank account, defaults "Open;" do not change.
After entries and selections have been made, select Save. The bank account is added and displayed on the Bank Account Setup screen.
Next, you will need to establish your bank account and its use by company / state / line of business. This is also done in Company Configuration Tool. Access Company Configuration Tool / Company / and Edit your company. Once the General tab is open, click the Line of Business tab.
Highlight the company / state / line of business you are assigning the account to.
In the bottom portion of the screen, click Select.
When the Add Bank Account screen displays, choose the account number from those listed in the combo box.
Assign a corresponding Bank Account Use by clicking Add, selecting the check type from those listed in the combo box on the Add Bank Account Use screen (e.g., Claim Drafts), and choosing Save.
The bank name and account number are displayed in the list view. Make sure you click Save before exiting your company's set up information.
For anyone issuing claims drafts, you will need to give them the authority to do this. Go to Diamond Administration / Users & Workflow Queues. Click User.
In the list view, highlight the user you will give the authority to and click Edit.
Once the Edit User Setup screen displays, highlight the company the user is with in the Modify User Authorities section at the bottom of the screen, and click Edit.
When the Edit User screen displays, highlight Claim Transactions in the list of authorities.
Place a check mark in the "Issue Claim Drafts" field on the right side of the screen.
Click Close then Save to retain the change in authorities.
If you want Claim Drafts to be run in Check Processing, you can set up a job to only run those in Diamond Administration / Process Checks. Click Check Processing Wizard.
To set up (or add) a job:
Bank Account: Select the bank account you are using for the job from the combo box. If you wish to see more information about the account you selected, click the Detail button to return the Bank Account Detail screen.
Click Add to return the Add New Job screen.
Job Name: Enter the name of the job checks are being processed for (e.g., Claim Drafts).
Check Types: Claim Drafts - Click in the Claim Drafts field to place a check mark. Once you have made your selection, the company / state / line of business / check type is displayed in the list view.
Next, on the right side of the screen there are options you can use when processing the job. For more information about these options, please refer to Check Processing Wizard.
If you do not want the Payment Form field on the Claim Transaction screen to default to "Draft," you can skip this step. Should you want the field to default to "Draft," you will need to access Diamond System Editor. Once there:
Click the Claims / Transaction folder.
Double click the setting,"Claim Payment Form Default."
Enter 2 in the Value Data field, and click OK.
When exiting the Diamond System Editor, confirm your change by answering Yes to the question displayed.
Now that you have done all the steps leading up to issuing claim drafts, you are ready to start processing them. In the Claim System:
Add the loss notice, claimant and feature / coverage.
When issuing a transaction that is a "Loss Payment," once you have chosen "Loss Payment," the Payment Form field automatically defaults to "Draft" (if the system setting, "Claim Payment Form Default" is set to "2.") If it does not default, you can change it from "Check" to "Draft" by making the selection in the combo box.
After all loss payment information has been entered, click Issue.
The Loss Payment, in the form of "Draft," is ready to be processed in the job you set up in the Diamond Administration: Check Processing Wizard.
Go to Diamond Administration: Process Checks / Check Processing Wizard.
Process the job you set up as "Claim Drafts."