Note: You must have the authority to post cash to make an E-Check payment.
E-Checks (more commonly known as "One Time EFT Payments") is a payment option that works much the same way as an Agency EFT Payment except that the routing number and account number are stored on a per payment basis instead of per agency. Typically, a policyholder provides a routing number and account number for the account from which the payment will be deducted. The payment is then applied in Diamond and written to an EFT file that is transferred to a bank.
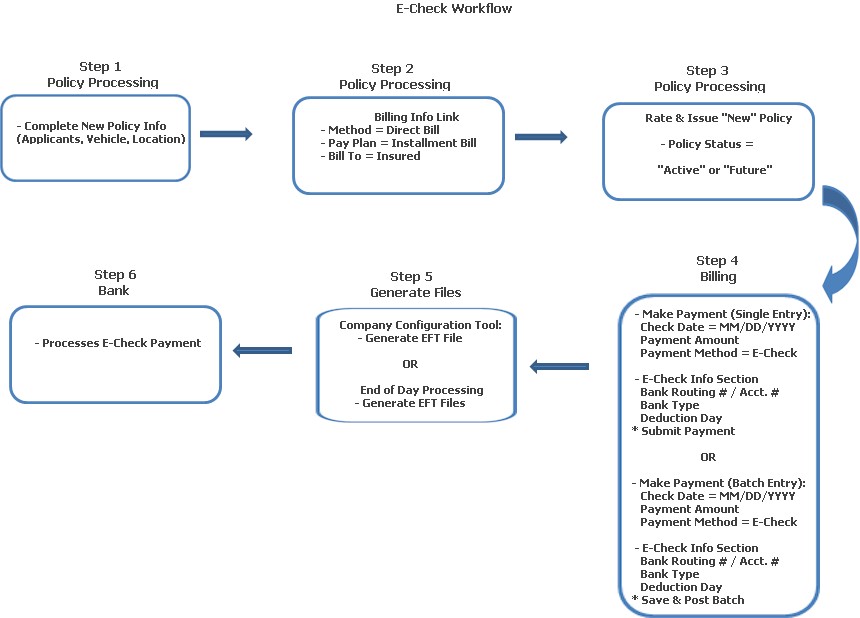
This Help File provides a workflow of the process as well as step by step instructions for processing an E-Check.

On a "New" Policy, complete all information required, such as Policy Level Coverages, Applicants / Drivers, Location / Vehicle information.
Click the Billing Info link at the bottom of the Navigation Pane:
Method: Select "Direct Bill."
Pay Plan: Choose any of the installment plans.
Bill To: Select "Insured" from the combo box.
Rate & Issue the "New" policy. The policy's status can be "Active" or "Future."
You can either elect to post E-Checks via the Statement Display screen / Make a Payment button (Single Entry) OR you can post them with other receipts in Accounting: Policy Payments (Batch Cash Posting.) In this example, we will use single entry posting.
Access the client's account, and click the Billing link (Quick Links Pane.
On the Statement Display screen, click the Make a Payment button.
On the Receipt Information screen:
Amount: Enter the payment amount due.
Payment Method: Select E-Check from the combo box. Once you have done that, the E-Check Information section displays.
Bank Routing Number: Enter the routing number of the bank the account is located at.
Bank Account Number: Client's bank account number where the deduction will be made.
Bank Account Type: Select "Checking" or "Savings" from the combo box.
Deduction Date: Defaults to the calendar day in the system's date.
Click Submit Payment to post the payment. A line is displayed on the Statement Display screen, marked as "E-Check." The amount is applied and the balance equals zero (0.00)
Once E-Check payments have been posted, they are flagged and sent to the bank for processing the transactions. This is done by one (1) of two (2) programs:
Company Configuration Tool / EFT / Generate File: The Generate EFT Files process must be executed as part of your company's nightly routine, OR
End of Day Processing: A check mark should be placed in the "Generate EFT Files" process. This is also run at the conclusion of your company's business day as part of their nightly routine.
The client's bank processes the payment.